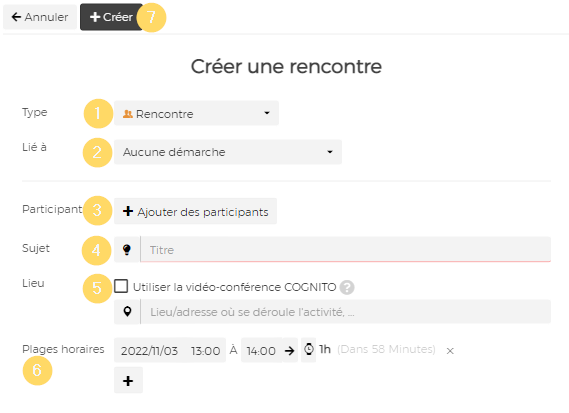
Vous aurez à entrer quelques informations pour créer l’activité: seul le “Sujet” de l’activité est obligatoire à remplir, le reste peut être complété après la création de l’activité.
1. Le type de l’activité
2. Lier cette activité à quoi? Est- ce que cette activité est en lien avec un parcours d’accompagnement?
Vous avez trois choix ici:
Un parcours individuelle
Un parcours de groupe
Aucun parcours car il n’y a pas de processus d’accompagnement en lien avec cette rencontre ( par exemple: partenariat, appel d’information, administration…).
3. Indiquer avec qui cette activité aura lieu:
Un contact dans le cas d’un parcours individuelle
Plusieurs personnes dans le cas d’un parcours de groupe
Un participant dans le cas ou il n’y a aucun parcours.
Cette activité est assignée à qui? Visible uniquement en mode **multi-utilisateur ** vous devez sélectionner l’utilisateur attitré à cette activité.
4. Le sujet de votre activité.
5. Indiquer le lieu où se déroulera cette activité.
Une vidéoconférence à partir des outils intégrés et confidentiels de Cognito-app
Le lieu ou un lien pour une rencontre virtuelle avec un autre outil. Si vous entrez un lien ( ex: Zoom, Team’s…) important de mettre le lien complet qui inclus le http…
6. Ajouter la ou les plages horaires associées à cette activité.
7 Cliquez sur le bouton Créer en haut à gauche.
Truc: Cliquez sur l’icône pour entrer un lieu préenregistré.
Lorsque l’information du lieu est indiquée, vous pouvez cliquer dessus et Cognito-app ouvrira automatiquement une carte de l’endroit ou le site de votre rencontre virtuelle.
Dans une deuxième étape, vous pourrez ajouter des détails supplémentaires maintenant ou plus tard à votre choix.
1. Le statut de l’activité.
Cette icône s’affichera également dans votre calendrier Cognito-app ainsi que dans un autre agenda si celui-ci est synchronisé.
8. Mettre une pièce jointe de tous types (document,image,audio,You Tube, présentation…) que vous pourrez ouvrir à partir de votre Cognito-app et rendre disponible dans l’ Espace Client.

 .
.
 pour entrer un lieu préenregistré.
